
Beauty tips and tricks! Fashion on the go! And easy to do DIYs!

Before we actually get into the Beauty/Fashion/DIY of the week, I have awesome news! I'm going to be posting fashion trends, beauty tips and DIYs on every Friday. And my Writing blog will be updated from time to time! I hope you guys find my "Beauty, Fashion & DIY's" section helpful and don't forget to follow & share my blog! Don't forget to comment! Also you can leave me personal messages by clicking on the contact tab on top! And also let me know in the comments section of this page what DIY/Beauty/Fashion Trend you would like me to post next Friday! Have fun!


2. Constantly tapping away on a keyboard can be hard on your nails. Try a silicone cover over your keyboard to provide a cushion for your nails.


I like to do this facial one night before some special day, or any day that I feel like looking a little extra special. It doesn't take much effort, and all the products that I have used are way within the reach of our wallet!
So, lets get started,
You can use any branded products apart from the ones I've mentioned.
The basic products you would need are:
- Sanitizer
I used: Zuci Strawberry Sanitizer - which is my favorite sanitizer!

- Cleanser
I used: Neutrogena Ultra Gentle Daily Cleanser

- Scrub
I used: EverYuth Naturals Ultra Mild Scrub

- Face Pack/Mask
I used: Nature's Lacto Tan Clear Pack - but I also love using Biotique's Bio Fruit Whitening Pack.


- Face Wash
I used: Garnier Light Face Wash

- Moisturizer
I used: Bath & Body Works Into the Wild Lotion

- Under Eye Cream
I used: Garnier Under Eye Roll On

- Lip Moisturizers/Balm
I used: Upper Canada's Naturally Lip Butter in Olive and Avocado Flavour

- Tissues/Paper Towels
- A Bowl of Water
- Cotton Pads
The amazing thing about this facial is that half of it is my night time routine! So all you would need to do is add a few steps before your actual night time routine which I know is definitely not much of work.
First, we need to sanitize our hands before we get in any further as breakouts often happen due to unclean hands. So rub that sanitizer in nice before you get started.
Push out any hair out of your face using with a head band or a head scarf. Now cleanse your face using the cleanser and while doing so, make sure to remove any make up if you have any on. And clean it off with the cotton pads or tissues as you prefer.

Cleanse thoroughly till your neck and you can go till your collar bones but I like to stop at the neck. After this, dip you fingers in water and wipe your face with the water and dry your face with paper towels.

Moving on to the next, take a generous amount of scrub into you hand and using your fingers gently, rub it against your skin in circular motions. If you have oily skin, you want to focus on the t-zone of your face and also your nose and chin areas which are know to be the most oily. Scrub your face till you feel like it and don't forget to scrub your lips as well. With the water, wash your face and wipe of any scrub that's left over.

Pat your face dry and now apply the face pack/mask evenly. Leave it on for 15 minutes and let it dry. Once it has completely dried, wash the pack/mask completely. By now, you must already be feeling the freshness on your face. Take a small amount of the face wash and go ahead to wash your face.

Let your face air dry. Don't use a towel or anything else to pat dry. Once your face is dry, slowly massage your face with the help of some moisturizer. After which you can apply an under eye cream if you want.
Now we don't want to forget the lips, apply some lip balm and get a good night's sleep!
This is best done in the night before bed as the moisturizers and the products we use would stay on and work well into our skin.
My night time routine is from the face wash. So the cleansing, scrubbing and face pack are the only three things which we would have to do! I hope you guys found this useful. You guys can use any products but the products I have used are very pocket friendly! Well pamper yourselves and have a blast! Hey, why not through a facial party for your sleepovers! They'd be a great way to bond!
Hope you guys had fun! Stay Glam, Keep Crafting & Flash that Million Dollar Smile! ^_^


You will need: clear fishing line, heart punch, card stock in fun colors, tape (regular-scotch tape will do), and scissors.


Before we actually get into the Beauty/Fashion/DIY of the week, I have awesome news! I'm going to be posting fashion trends, beauty tips and DIYs on every Friday. And my Writing blog will be updated from time to time! I hope you guys find my "Beauty, Fashion & DIY's" section helpful and don't forget to follow & share my blog! Don't forget to comment! Also you can leave me personal messages by clicking on the contact tab on top! And also let me know in the comments section of this page what DIY/Beauty/Fashion Trend you would like me to post next Friday! Have fun!

Here is a little something for you guys to try! It's been my recent favorite and I'm obsessed with this hairstyle! Give it a try!
THE WATERFALL BRAID
Do try this and let me know how it came out for you!
Hope you guys had fun! Stay Glam, Keep Crafting & Flash that Million Dollar Smile! ^_^

1. In a pinch, reach for chap-stick/almond oil to moisturize your cuticles and keep them healthy.
The Body Shop's ALMOND NAIL & CUTICLE OIL is a great option.
2. Constantly tapping away on a keyboard can be hard on your nails. Try a silicone cover over your keyboard to provide a cushion for your nails.
3. Only file your nails in one direction. Filing nails back and forth can be too harsh and cause them to peel and become damaged and may even degrade their growth rate.
4. If your nail polish is starting to chip off and you are looking for a quick fix, add some quick nail art. Paint on some quick stripes or dab on a few polka dots for a fun and fresh manicure.

Here is a quick four step nail art you can do for yourself! Isn't it fun, the picture can't get clearer than this! ^_^
5. To make your manicures last longer, apply cuticle oil to your nails after the polish has dried. It will last longer and keep your nails looking shiny.
This is another great option for a cuticle oil!
Hope you guys had fun! Stay Glam, Keep Crafting & Flash that Million Dollar Smile! ^_^

I have a really cool DIY for this week! I'm so
excited with this DIY as I find it really useful and unbelievably helpful. I
have a hard time planning out my time without a physical calendar! I can’t do
it on my phone, as I feel using your phone is less creative! I wanted to create
a schedule that would motivate me to complete my work every time I saw it! So,
this week we're going to make a DIY chalkboard planner/DIY room decor! Not only
is this helpful, but it also completely adds a whole new look to your room!
DIY CHALKBOARD
PLANNER/DIY ROOM DECOR
I recently started taking an online class and I realized
that I needed a planner to remind myself of the work load I had for each week.
Hence, I decided to create this!
You will need:
- Self-Adhesive Blackboard
- Chalk
- Washi Tape
- Scissors!
Now, find the perfect space in your room. The
space is for pasting the self-adhesive chalk board. Once you have found the
ideal space in your room, measure out the surface area that you want to paste
your chalk board and cut out that much from the self-adhesive chalk board roll.
After cutting out the needed amount of chalk
board, paste it on to the desired wall.

Now take the washi tape you want to use & cut
it out to the length of the chalk board and paste it on to the edges of the
chalk board like so:

Do the same for all the left over three sides and
you'll have yourself a beautiful chalk board in your room where you can write
down your schedule, doodle or just write stuff randomly!
There is so much you can do with this! Cut the self-adhesive
chalk board in shapes you want! Adding the washi tape is completely your wish!
I think it looks fine without the washi tape but it helps add the needed pop of
color!
Here are some inspiring ideas that you can use for
decorating your home/room with the awesome self-adhesive chalk board!
This is such a cute desk idea. Cutting out the chalk
board in the shape of a cloud! You can write down your thoughts!
This next idea is an innovative idea for your
kitchen! Makes it fun for the kids to draw on as well!
And you'll never forget where you put what! ^_^

Find you own way to customize the chalk board!
Get Creative!
Hope you guys enjoyed the DIY! Keep Crafting,
Stay Glam & Flash that Million Dollar Smile! ^_^
One of the major troubles we face is appropriately styling white shirts/blouses the right way. What I told you I found a way you could style white shirts/blouses and another significant piece in our wardrobes together and make them work like magic.
This other significant piece that we're talking about that is a must in today's fashion are the colored pants/jeans! These are a rave now a days and almost everyone owns at least one.
STYLING WHITE SHIRTS/BLOUSES OR STYLING COLORED PANTS/JEANS
By now the idea of what I'm speaking must be really clear to you girls! Oh yes! I am talking about pairing you white shirts or blouses with the oh so trendy colored jeans/pants! Isn't that just the perfect way to show off two of the most stunning pieces you can find in your wardrobe! These pieces work literally like magic together creating an edge to an outfit that is not only sophisticated but also elegant. This outfit is great for work where you want to add that pop of color or for college where you need an outfit to feel comfortable and edgy!
This outfit works because it is also very practical apart from being so fashionable. You have the pockets you need to carry around stuff that is of frequent use like your phone or keys. And you can style them with practically any kind of accessories as your top is pretty much close to being neutral!
I put together some outfit ideas, lets have a quick look so that you can use this for your basic idea to build the outfit you like with the pieces you have,
OUTFIT #1
The first outfit is an outfit that would be more appropriate for college or school. This is a plain white top that had been paired with a coral colored jeans and a beautiful grey and black colored, round neck jacket that can be zipped you in case you get a little cold. The bag is neutral, so by default the shoes would also be neutral i.e nude heels or flats as per your preference. Coming to the accessories, the neck piece is minimal as that complements the jacket. The arm candy is all gold, you can put on a single gold cuff as well and a beautiful statement ring to top that all off!
OUTFIT #2
The second outfit is a more work oriented outfit. Here, along with a clean white button up shirt we have paired maroon ankle length pants. What I love about the shirt is that pop of color at the cuffs of the shirt. The cuffs add the more formal feel to it while the pop of color makes it fun. You can throw on a brown belt like here and make it more formal. The accessories in this case are more minimal as it is work oriented, a small bracelet or a chunky watch would just do the trick. The bag is my most favorite as it is animal print which brings out the fashionista in you at work. The shoes are also very elegant and feminine and i love the fact that its color coordinated with the pop of color in the cuffs! And the school girl kinda shoes also make it a lot of fun!
Here are some more examples with different colored pants/jeans and white shirts/blouses and ways you can accessorize them with jewelry, shoes, jackets and of course bags!
I also thought I must add some examples of styling colored pants in specific as jeans are the most sought out and its always a good thing to have information or ideas on things we find rarely. I have included one that is casual and another that is a little bit more formal. So here goes, hope this helps!
CASUAL
This is just a beautiful and feminine white peplum top that has been paired with greenish-yellow colored cotton pants, a statement piece and bold chunky heels in gold. WOW! That totally rhymed!
FORMAL
And the other example is a button up white shirt that is paired with an ankle length yellow colored pant. A belt always gives a more formal look and feel to the outfit and again the accessories are minimal since it is formal. The bag and shoes are color coordinated! Just the way I like it!
Hope you guys had fun! Stay Glam, Keep Crafting & Flash that Million Dollar Smile! ^_^
I decided to share with you guys a simple and easy facial that you can do for yourself and pamper yourself and get that indulgence you deserve.
I like to do this facial one night before some special day, or any day that I feel like looking a little extra special. It doesn't take much effort, and all the products that I have used are way within the reach of our wallet!
So, lets get started,
You can use any branded products apart from the ones I've mentioned.
The basic products you would need are:
- Sanitizer
I used: Zuci Strawberry Sanitizer - which is my favorite sanitizer!

- Cleanser
I used: Neutrogena Ultra Gentle Daily Cleanser

- Scrub
I used: EverYuth Naturals Ultra Mild Scrub
- Face Pack/Mask
I used: Nature's Lacto Tan Clear Pack - but I also love using Biotique's Bio Fruit Whitening Pack.

- Face Wash
I used: Garnier Light Face Wash

- Moisturizer
I used: Bath & Body Works Into the Wild Lotion

- Under Eye Cream
I used: Garnier Under Eye Roll On

- Lip Moisturizers/Balm
I used: Upper Canada's Naturally Lip Butter in Olive and Avocado Flavour

- Tissues/Paper Towels
- A Bowl of Water
- Cotton Pads
The amazing thing about this facial is that half of it is my night time routine! So all you would need to do is add a few steps before your actual night time routine which I know is definitely not much of work.
First, we need to sanitize our hands before we get in any further as breakouts often happen due to unclean hands. So rub that sanitizer in nice before you get started.
Push out any hair out of your face using with a head band or a head scarf. Now cleanse your face using the cleanser and while doing so, make sure to remove any make up if you have any on. And clean it off with the cotton pads or tissues as you prefer.

Cleanse thoroughly till your neck and you can go till your collar bones but I like to stop at the neck. After this, dip you fingers in water and wipe your face with the water and dry your face with paper towels.

Moving on to the next, take a generous amount of scrub into you hand and using your fingers gently, rub it against your skin in circular motions. If you have oily skin, you want to focus on the t-zone of your face and also your nose and chin areas which are know to be the most oily. Scrub your face till you feel like it and don't forget to scrub your lips as well. With the water, wash your face and wipe of any scrub that's left over.

Pat your face dry and now apply the face pack/mask evenly. Leave it on for 15 minutes and let it dry. Once it has completely dried, wash the pack/mask completely. By now, you must already be feeling the freshness on your face. Take a small amount of the face wash and go ahead to wash your face.
Let your face air dry. Don't use a towel or anything else to pat dry. Once your face is dry, slowly massage your face with the help of some moisturizer. After which you can apply an under eye cream if you want.
Now we don't want to forget the lips, apply some lip balm and get a good night's sleep!
This is best done in the night before bed as the moisturizers and the products we use would stay on and work well into our skin.
My night time routine is from the face wash. So the cleansing, scrubbing and face pack are the only three things which we would have to do! I hope you guys found this useful. You guys can use any products but the products I have used are very pocket friendly! Well pamper yourselves and have a blast! Hey, why not through a facial party for your sleepovers! They'd be a great way to bond!
Hope you guys had fun! Stay Glam, Keep Crafting & Flash that Million Dollar Smile! ^_^
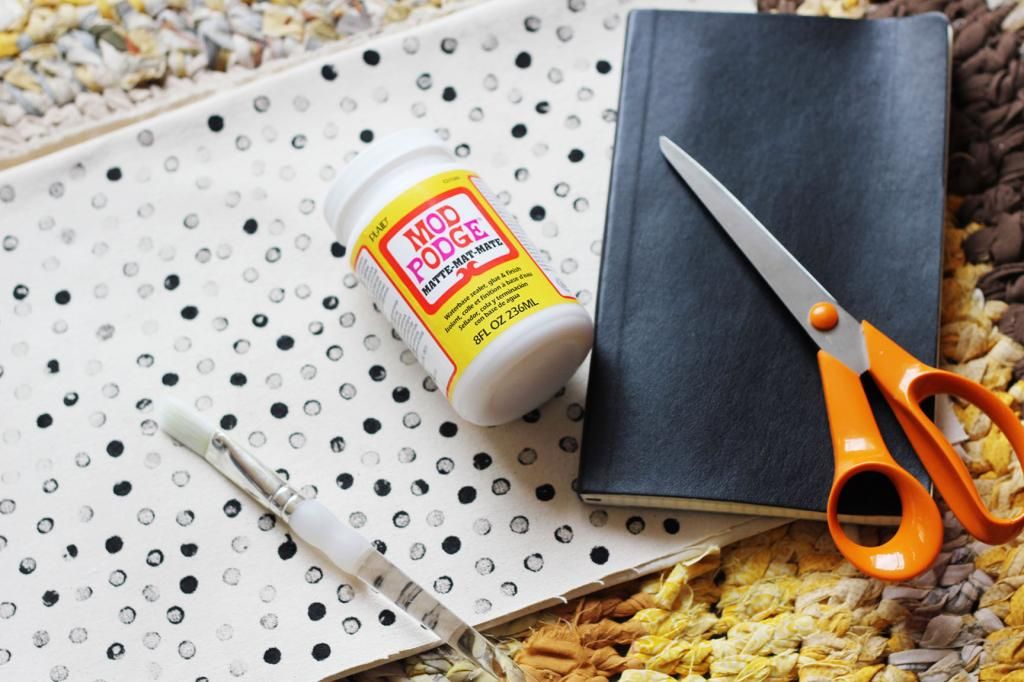
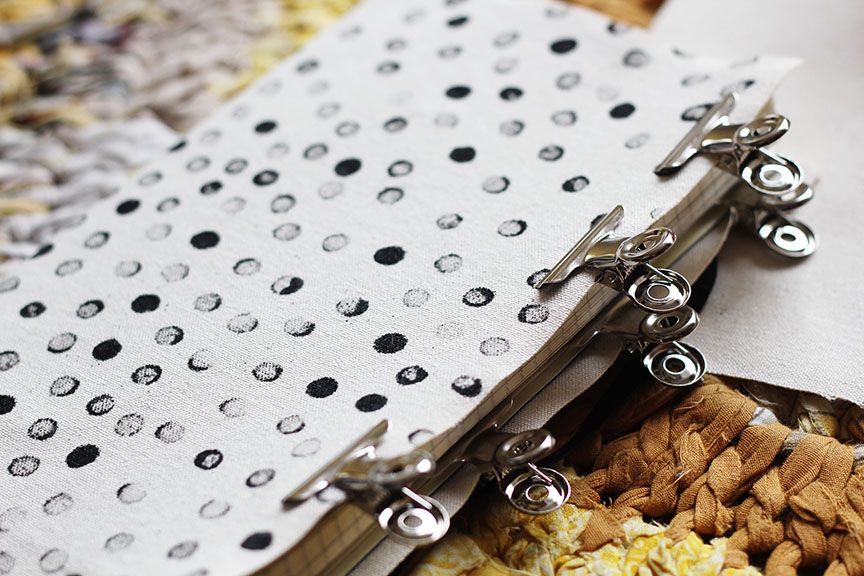
DIY Stamped Notebook Covers!
I decided to go with a back to school DIY and yes I know, I've been posting oh so randomly! Because I love to blog I've broken the rule by posting almost every other day! ^_^
Anyway, this DIY should help you jazz up your boring school notebooks or any book for a matter of fact!
You will need: A Fabric, A pencil with an eraser end, Fabric Paint, Notebook, Fevicol/ModPodge/Hot Glue Gun, Paint Brush, Scissors, Jump Clips.
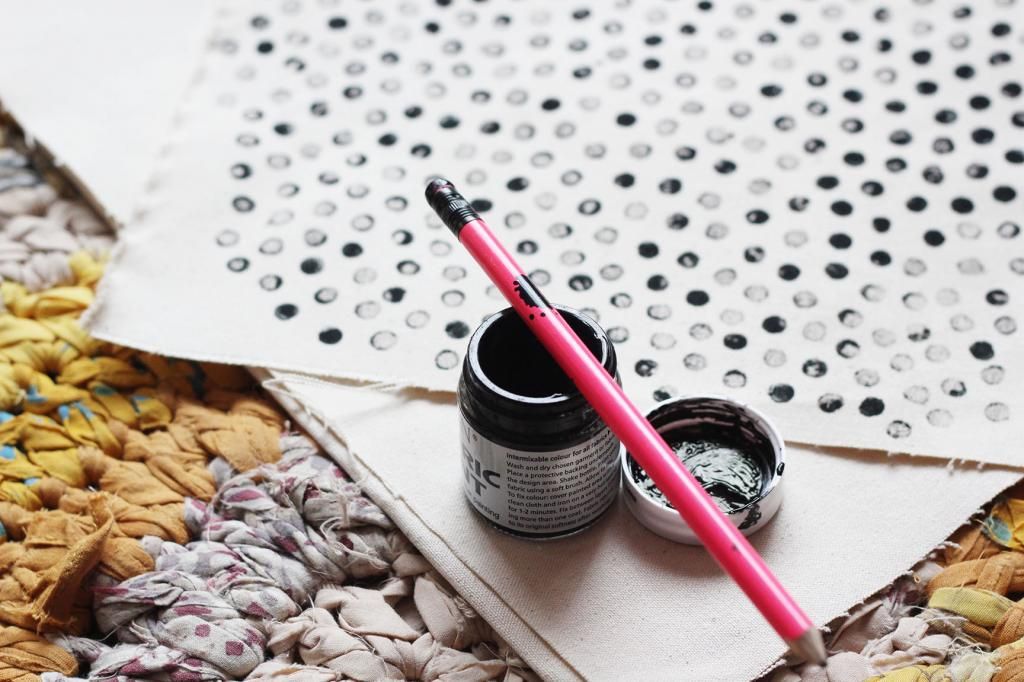
This a simple and easy DIY to do to make your notebooks look and feel a little out of the ordinary. Hand stamping is fun way to make a pattern on fabric and takes very little time.
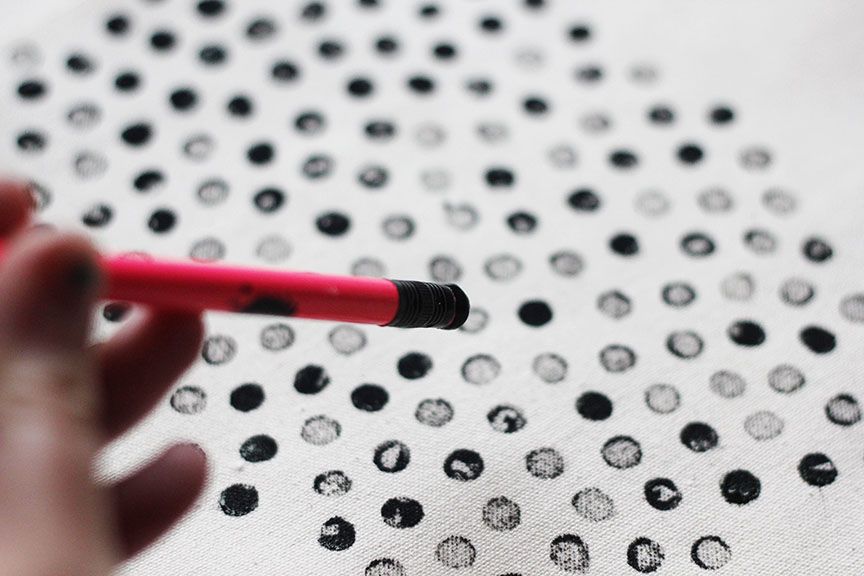
Now, you want to measure up the amount of fabric you would need to cover your notebook. Make sure to take a little more fabric than what is exactly needed and use your scissors to cut the needed length. Place your fabric up right on a flat surface. Dip the eraser end of your pencil into the fabric paint you want to use. Here, be creative and use any color you want. You can make it an ombre pattern or a multi colored pattern but for that you will need more pencils with eraser ends. Stamp the fabric till you are satisfied with the result. It need not be perfect, the beauty of it is the imperfection. So, don't worry about it.
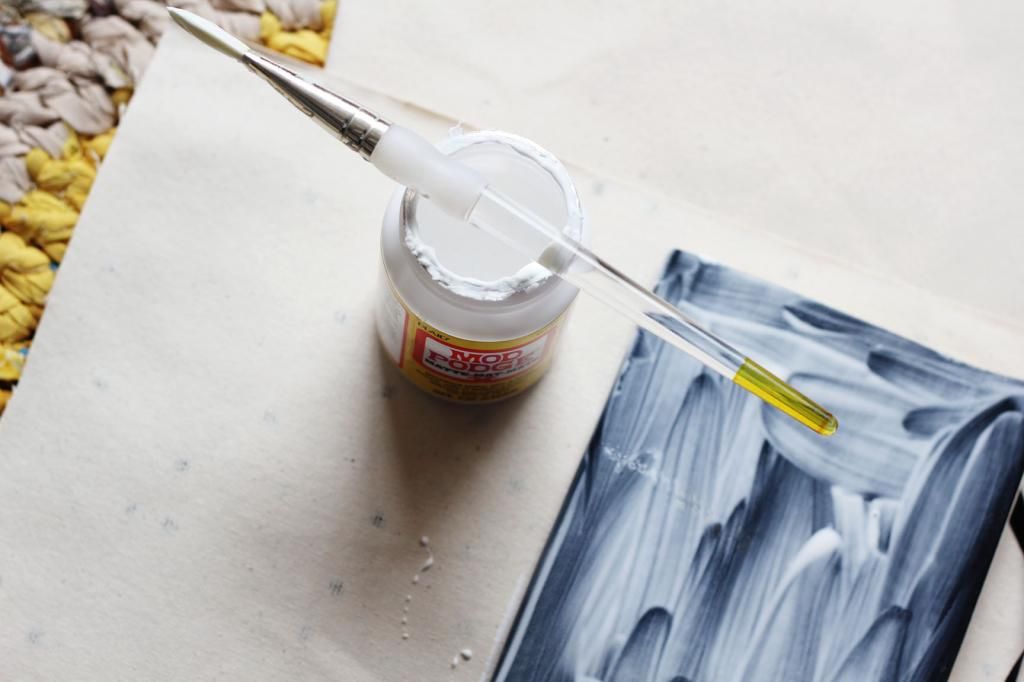
Let the fabric dry. Meanwhile, apply a generous amount of modpodge/fevicol or use your hot glue gun, if you can work with it and carefully use the fabric to cover up the notebook.
Once you have covered the notebook, use the jump clips to hold the fabric in place and leave it undisturbed for a few hours. After it dries, all you need to do is fold the excess fabric into the notebook and glue it in or you can carefully cut the excess fabric using scissors to the exact shape of your notebook.
Now you have a hand stamped notebook that looks just as fashionable and elegant as you!
Get creative and experiment with colors!
Hope you guys enjoyed the DIY! Keep Crafting, Stay Glam & Flash that Million Dollar Smile! ^_^
We all know how college is and I know what a pressure it is to always put the best foot forward, always be alert on our toes and be absolutely presentable through out the day!
And then there are the others who put very little effort into their apperance! The way we dress and present ourselves is such an important part of preparing ourselves for success. After all, our clothes and appearance speak volumes about us, way before we get to speak a word, they talk about our attitude, our confidence and our character/identity. So to help out all those out there who're maybe a little confused about putting together a simple outfit for a regular day, this might help
STYLING SHORT KURTIS / STYLING FLORAL PANTS
Short Kurtis and Jeans, Short Kurtis and Jeggings are quiet common outfits but to add a twist to the regular outfits why not try floral pants and throw on a pair of comfy flats or stilettos for the edgy feel.
I put together three outfits based on the same idea, here goes:
OUTFIT #1
For this outfit, I picked a black tunic which is a basic piece in most of our closets and of course, floral pants. For footwear, as you feel like that day, you can wear either striking stilettos or comfy nude flats.

OUTFIT #2
For this particular look, I preferred a basic black kaftan. I'm very much into kaftans this year. They're more
comfortable and pretty easy to carry off. Again, a pair of floral pants and a pair of hot pink stilettos that complement the floral pants and add that much needed pop of color.

OUTFIT #3
For the final look, I chose an orange tunic with a belt which would help compliment your body type. You can opt not to wear the belt too. A pair of floral pants and nude stilettos, you're done! Now, don't you look glamorous!

Nude flats or stilettos go with almost any outfit as they are neutral in tone. And it is not a compulsion to wear stilettos, you can always wear flats in a color that compliment the outfit!
Experiment with your ideas and explore to find your style with floral pants!
Hope you guys had fun! Stay Glam, Keep Crafting & Flash that Million Dollar Smile! ^_^
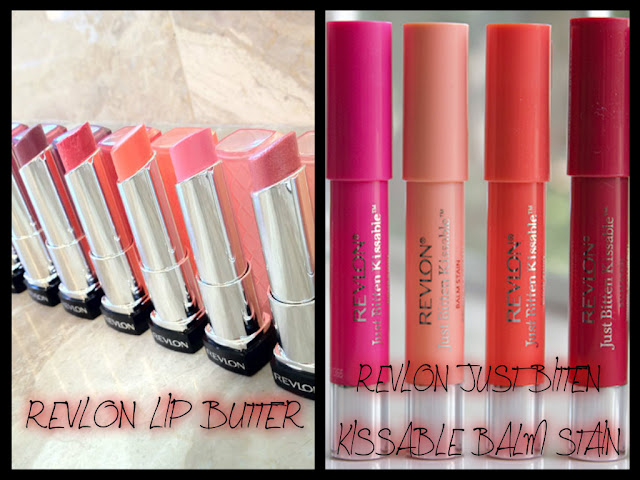
Let's get straight down to business! I recently bought almost all of the Revlon's Just Bitten Balm Stains! And previously I had also tried the Revlon Lip Butter! I know you guys must have guessed it.. Yes! It's product war time alright!


REVLON LIP BUTTER
Revlon lip butter feels quite smooth , almost a jelly- like substance on your lips.
It has a glossy finish and you can totally skip the gloss if, you are a gloss person.
It is also very moisturizing but doesn't last as much long as expected.
Overall its a decent bargain for someone who wants to buy a lip product that is between a lip gloss and a lip stick!
I am a matte person so, not very pleased with the product but great if you have the mood for a little glossiness!
REVLON JUST BITTEN KISSABLE BALM STAIN
Revlon just bitten kissable balm stain has a slightly glossy finish which I prefer and with the right technique of application they can almost look matte! The colors that are light are more build-able. And as you can tell, it's a tinted balm. I prefer tinted balms/lip stains to lipstick any day as they're more fun to experiment with. Darker shades are more opaque and aren't as quite build-able but come on! I mean, that's the reason why they're dark!. It would take 2 to 3 applications for full coverage.
Just bitten balm stains are long lasting and can last up to 6-8 hrs which is great for someone like me who doesn't really look to making touch ups every now and then.
If you're looking for something remotely glossy and a lip stain craze like me,
your search ends here!! Go and get one NOW!
AND THE WINNER IS!
You can probably already tell by now that I'm all out for the REVLON JUST BITTEN KISSABLE BALM STAIN! I love the colors, the feel and the nude stain has made me fall in love with it! Also, the peppermint smell of these drives me crazy! And the biggest advantage is that these last long!
Well! Try both the products and you might as well decide for yourself!
Hope you guys had fun! Stay Glam, Keep Crafting & Flash that Million Dollar Smile! ^_^

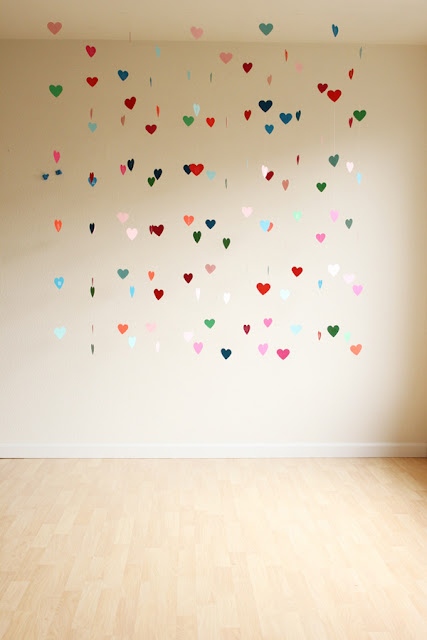
I'm crazy about hearts this year. I've been planning this DIY for quiet sometime now! So I got inspired to making this DIY when I saw wall hangings in a furnishing store. So, I set off to the craft store and grabbed the biggest heart punch they had and went home to punch my crafty little heart out.
You will need: clear fishing line, heart punch, card stock in fun colors, tape (regular-scotch tape will do), and scissors.

Use the punch and punch away as many hearts as you can. For this set up in the picture, I needed 20 garlands with 6 hearts each. I used 6 colors & only needed 20 hearts of each color, plus a few extra to mix and match here and there.
Once all of your hearts are cut out, make 20 sets of 6. Try and mix up the colors so each stack is a little different. Cut a piece of fishing line and strand your garland on the table with tape. Fishing line is a bit tricky to work with and you can lose your pieces really easily. Set up a work space on the floor. Measure the distance from the ceiling to where you want the last heart to land. Tear off ten pieces of scotch tape and place five on each end about six inches apart. Take the fishing line and pull it out 12 inches. Tape it down at one end of the floor and pull the spool down to the second piece of tape. Tape the line taut and cut. Start at the other end and tape down four more pieces. Once your lines are taped, add each set of hearts by lining up the center of the heart underneath each line, about a foot apart. Repeat until you have all of your hearts under the lines. Check and move colors around until it looks fabulous!
Then take a small piece of tape and attach each heart to the line. Make sure all of your hearts are attached before peeling back the painters tape and hanging. Hang your garlands one at a time, starting five feet from the wall, and hang one garland to the edge of your photo booth area. Add the remaining garlands 1 foot apart, also attaching to the ceiling. Hang the rest of the garlands and repeat with the next two rows.
You can make as many garlands as you want and store them. Keep them in separate ziplock covers to keep the garlands from tangling.
Once they are all hung, pop in the middle of them and smile! These would be really fun in an ombre where the color is fades as it gets closer to the floor or even just a solid color. This is one of those projects that just makes me happy in my heart!
Another great thing about this project is that you can make them in practically any shape! You needn't necessarily buy a punch you can just cut the colored card stock into strips of paper in a solid or ombre fashion and do the same as above! It would just look amazing. Check this one out!
Hope you guys enjoyed the DIY! Keep Crafting, Stay Glam & Flash that Million Dollar Smile! ^_^

Love the Outfits and the DIY's. Please do something for party favors.
ReplyDeleteSure! There is just so much more in store!
ReplyDelete